During our three week visit in London, my husband Rich and I each made a few compromises to indulge the other in some attractions or activities that only one of us had great interest in. Rich gamely accompanied me to
Madame Tussauds Wax Museum, endured watching the
Royal Wedding of Prince Harry and Meghan Markle on a big screen at an event hall and spent a day looking at floral displays during the
Chelsea in Bloom competition that was a side event to the annual Chelsea Flower Show. I spent many an hour waiting while he ogled expensive vintage watches in
Mayfair and the
Portabello Road Market and tagged along as he inspected old airplanes and steam engines at the
Science Museum. The days that we spent visiting
War Museums were definitely added as tallies on Rich’s vacation activity scorecard, appealing to the history buff in him.
The
Imperial War Museum was founded in 1917 in the Crystal Palace, the location of the Great Exposition. The museum moved locations several times until 1936 when it was relocated to its current home in the former Belthem Royal (psychiatric) Hospital in Southwark. Outside the museum sits a pair of
15-inch guns which come from the naval battleships HMS Ramillies and HMS Resolution. The Imperial War Museum’s collection focuses on artifacts related to war efforts of the British Empire from World War I through to the present day. It includes items such as uniforms, flags, badges, insignias, personal documents, equipment such as radios, cipher machines, radar, cameras, medical equipment and messaging techniques, weapons and ammunition, war art and vehicles including tanks, aircraft and ships. There are special galleries devoted to WWI and WWII. Items on display in the vast atrium included a
Reuters Foreign Press truck, a Soviet-designed
T34 tank, a WWII British
Spitfire fighter plane that was instrumental in the Battle of Britain, a Hawker Harrier Jump Jet that takes off and lands like a helicopter, a
V1flying bomb that flies in a horizontal path until it runs out of gas, and a
V2 ballistic missile rocket that flies too quickly and too high up to be shot down from the ground. One disturbing “art piece?” is the remains of a vehicle that was totally demolished by a car bomb in central Baghdad on March 5, 2007. No one was in the car but 38 people in the vicinity were killed and hundreds injured in the explosion.
The most interesting section of the museum was the one dealing with
World War I because it focused not only on military artifacts but also on personal items and correspondence that illustrated the impact that the war had on both the soldiers and their families back home. War hero Lord Herbert Kitchener was featured in an iconic
recruitment poster which later inspired the American’s “Uncle Sam Wants You” recruitment poster. The poster includes the word “Britons”, an image of Kitchener staring directly ahead and pointing at the viewer, and then the words “Wants You – Join Your Country’s Army”. His urging inspired a 9-year-old Irish boy to offer his services as a bicycle messenger and prompted a marriage proposal from one of his adoring fans. There were examples of recruitment posters from other Commonwealth countries including the Canadian Mounted Rifles and the armies of Australia, New Zealand, Bahamas and South Africa. The sinking of the U.S. Cunard passenger ocean liner
RMS Lusitania, as depicted by a moving recruitment poster depicting a drowning mother cradling her baby, angered the Americans and prompted them to finally join in the war.
There were posters and books that highlighted the importance of
women working to build arms in munition factories, even though they were paid less and discriminated against by men who resented and felt threatened by their presence. Other propaganda posters tried to
shame seemingly able-bodied men who had not enlisted for the war. One poster showed soldiers, factory workers, nurses and even boy scouts participating in the war effort, while a leisurely strolling man in a suit is not pulling his weight. A cartoon shows a “Conscientious Objector” lazily lounging by his fireplace smoking a cigarette while his entire family is fighting or participating in war work. Then there is the guilty father having to explain to his children what he did (or did not) do in the Great War. One common shaming tactic was to present an un-enlisted man with a
white feather as a symbol of his cowardice. This practice was the basis of the classic 1939 movie “The Four Feathers”.
It was sobering to see the displays dealing with
food rationing during the war. Posters urged people to “Help the Fleet” by saving wheat and eating less bread. There were examples of reduced sizes of plates and bowls from both the British and German sides that were used to control rationed portions. Rich placed his hand in front of the “war dishes” for perspective to show how small the servings would have been. The German rationing system issued coupons to be redeemed for various groceries. The soldiers fared slightly better in terms of portions, when supplies could actually get to them in the war zone. Troops carried emergency “iron rations” consisting of army biscuits, a tin of “bully beef”, tea and sugar that would last 1-2 days in case they were under attack. The biscuits were so hard that they could not be bitten into without first soaking them or smashing them with a rifle butt. Instead of eating them, some used the biscuits to create war souvenirs. Another poster reminded civilians that merchant seamen were risking their lives to bring food to Britain, so no morsel should be wasted. There were models of ships that were painted with the “Dazzle” stripes that helped to camouflage the vessels and confuse enemy submarines trying to target them.
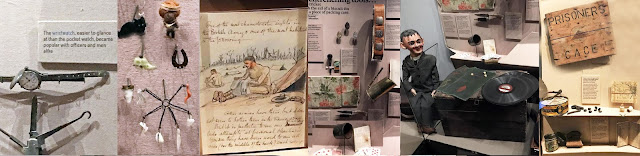
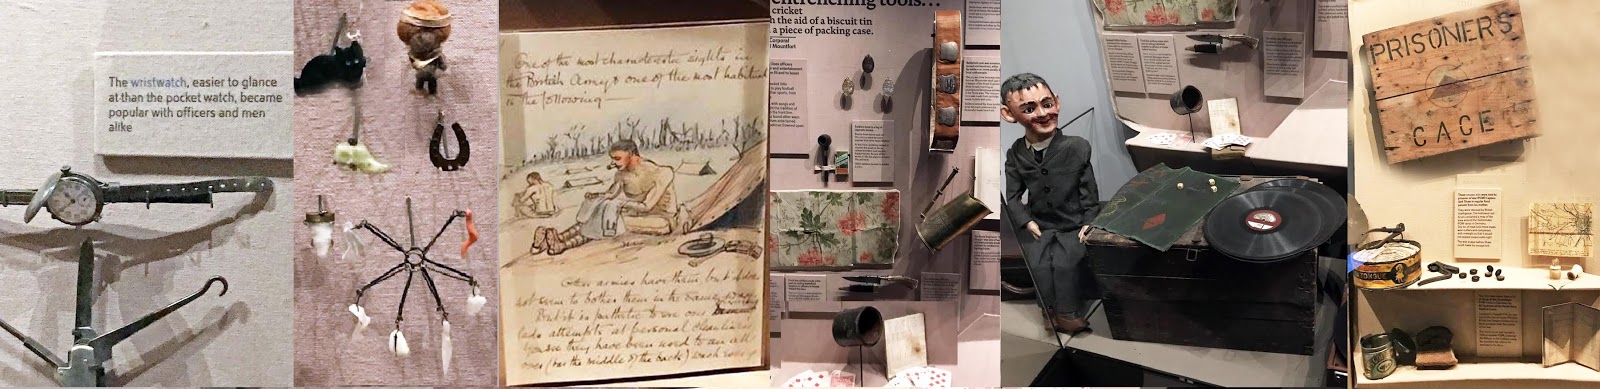
It was enlightening to see some
personal items of the British soldiers who fought in WWI. Rich was particularly excited to see a trench watch, a military watch with a cover like a pocket watch but more practical since it was worn as a wrist watch. There were examples of trinkets and tokens that superstitious soldiers carried around as good luck charms to keep them safe in battle. Of particular interest were items belonging to soldiers who had been captured as prisoners-of-war. While waiting for release after the war ended, the men leisurely passed the time by writing journals and letters that occasionally included sketches, playing sports such as tennis, cricket and boxing, making war souvenirs out of scraps, gambling with cards or dice and playing records on a phonograph. Sergeant Arthur Harden entertained the troops with his ventriloquist doll “Douglas”, possibly named after General Douglas Haig. It was considered the duty of Allied prisoners of war to try to escape. One display showed “
escape aids” that were sent by British Intelligence to Captain Jack Shaw, hidden in food parcels sent from his mother. Included was a map of the area around the POW camp hidden in a brush and wire cutters and compasses hidden in a “tin of meat”.
There were some unique British and German military equipment on display. The British used a hand-painted
sniper robe with colours chosen to allow a soldier to blend into his lair of earth and rubbish, and a
camouflage tree that was actually a hidden observation post based on a real tree found in no-man’s land. A replica tree with a steel core, a small seat and a sight-hole was created to replace the real tree at night, and an observer could crawl into the hidden space and watch the German lines. The heavy, water-cooled British
Vickers machine gun required 6 to 8 men to operate it—one to feed ammunition, one to fire and the rest to carry the weapon, ammunition and spare parts. The display in the museum showed the wide arc and range of gunfire achieved by the weapon. Hanging from the ceiling was an example of an observation car or “
spy basket” that was lowered below cloud level from a German Zeppelin airship. The car contained an observer with a telephone who helped navigate the airship and aim the bombs. The
French 75 Howitzer gun was one of the first rapid-firing artillery pieces and inspired a cocktail to be named after it (consisting of champagne, gin, lemon juice and syrup).
Poignant
war art included a large mural by Walter Bayes depicting civilians (mostly women and children) taking cover in the Elephant and Castle tube station in Southwark during a London air raid. A painting by official war artist Paul Nash depicts men of the 63rd Royal Naval Division resting in a trench while a sentry keeps watch using a mirror attached to his bayonet. War memorabilia included a figurine of naval minister Winston Churchill, a wooden figure mocking German field marshal Paul von Hindenburg by depicting him as an old man with gout, Churchill tank-shaped money boxes encouraging the public to save, and Toby jug steins shaped in the forms of allied commanders French General Ferdinand Foch, British Field Marshal Douglas Haig and US General John Pershing.
World War II displays were split into two sections with one dedicated to military equipment and the second to the Holocaust. We did not have time to visit both so since we had seen many Holocaust-related exhibits on a previous trip to Amsterdam, we opted for the military equipment.
Italian “human torpedoes” were used to attack British ships, using two-man diver-propelled vehicles to go under harbour defences and place warheads beneath targeted vessels. The
British Avro Lancaster, a four-engine heavy-bomber, was used to bomb German factories, railways and other key targets. The aircraft on display at the Imperial War Museum was nicknamed “Old Fred – The Fox” by its crew and enumerated the number of operations that it flew by markers on the side of the plane. The J
apanese Mitsubishi A6M fighter, nicknamed “
the Zero by the Allies” was designed to fly off aircraft carriers and was well-armed, fast and light with an aluminum-alloy hull. A decaying wreck of the Zero that was badly damaged in combat was found on Taroa Island (formerly a Japanese airbase) 50 years after the end of WWII and is now on display in the museum. The
American Sherman M4A4 tank, named after General William Sherman, was used by the British during the final years of the war to help liberate Europe from Nazi control. It was reliable, relatively cheap to produce and available in large quantities.
The
German BMW-designed R75 motorcycle and sidecar with the 750cc engine was armed with a machine gun and allowed advanced scouts to travel off-road at great speeds. By contrast, the
Welbike motorcycle was the smallest bike ever used by the British armed forces. Compact and lightweight, it could fit into airborne CLE Canisters carried by plane and would be dropped by parachute onto landing sites. Unfortunately the difference in weight between the parachutist and the motorcycle often meant that they landed some distance apart, thus defeating the purpose of the vehicle. An interesting Nazi symbol of power was a bronze sculpture of a
German eagle clutching a swastika in its talons. This was captured from the Reich Chancellery when Soviet soldiers attacked it, the same afternoon that Hitler committed suicide in his bunker underneath the building. As part of the civilian war effort, many women worked in munitions factories and kept their hair tucked under scarves. Those who could afford them might wear colourful
silk scarves by Jacqmar of London that depicted patriotic propaganda slogans and images.
Steel helmets and armbands were issued to indicate who you were and what your function was. Roles included the Women’s Voluntary Service, Firewatchers, Air Raid Precautions or the Home Guard. John Higgins, commander of Landing Craft Tank 157 which carried tanks to the beaches, was given a
flag made by a friend’s mother out of an old black-out curtain depicting a pirate skull and crossbones and a insolent, defiant slogan "Shit or Bust". The crew loved it and took on the motto as their own.
Following the major galleries devoted to the two World Wars, a single section covered all subsequent wars up to the current day, including the Cold War with the Soviets and the Nuclear Arms Race. Nicknamed “
Little Boy” and
“Fat Man”, the two atomic bombs dropped on Japan in 1945 are the only nuclear weapons ever deployed in war. The devastation and loss of life was so horrific that the threat of a nuclear attack has since then acted as a deterrent from any further use. One of the five
casings made for the “Little Boy” bomb has been placed at the centre of the Imperial War Museum, representing the “ultimate symbol of political power .. but also absolute fear and horror”. Nearby, a hand-operated siren formed part of the equipment in one of the 11,000 local warning posts that would raise alerts in the event of a nuclear attack. A 1963 poster from the
Campaign for Nuclear Disarmament (CND), depicting a a mushroom cloud exploding from the top of a skull, was considered so disturbing and controversial that it was banned from being displayed in the London Underground. Even more explicit is the 1966 sculpture called “
Beach Girl” which covered a disfigured shop window mannequin with cinders and black paint to vividly illustrate the impact of a nuclear bomb explosion. The burnt body missing part of her arm and leg left little to the imagination. A tiled mosaic of
Saddam Hussein was dismantled by British soldiers after he was ousted from power. Britain’s prime minister Tony Blair was one of the few allies that endorsed the U.S. invasion of Iraq in 2003 but his position was not supported by all, as shown by the protest poster with the slogan “
Make Tea, Not War”, showing Blair ridiculously wearing a tea cup as he holds a rifle.
Shortly after WWI, a war of independence followed by a bitter civil war split most of Ireland from the United Kingdom, leaving only the area now known as “
Northern Ireland”. Turmoil and “The Troubles” continued to plague Northern Ireland for many decades as Protestant British Loyalists battled Catholic self-identified Irish Unionists. In 1994, Belfast-born artist John Kindness created an art piece called the “
Sectarian Armour” which highlights these issues. One side of the front of the armour depicts Loyalist imagery and symbols while the other side represents the Irish Republic. On the back is a funeral scene where the coffin straddles both sides and is carried by members of each faction. In 1982 during the
Falkland War between Britain and Argentina, artist Linda Kitson was sent with the troops to be the official documenter of the campaign. She was issued a camouflage uniform and given an air-sea rescue container to keep her drawings dry. Kitson wrote a note indicating that if anything was to happen to her, it was imperative to save her portfolio of around 400 drawings. During the
Korean war, the Chinese hung propaganda posters from the barbed wire in front of British trenches depicting dead soldiers whose efforts are lining the pockets of a fat Uncle Sam hoarding war profits, with the slogan “You Die For Him”. A mangled, twisted and burnt remnant of a steel window frame lifted from the ruins of the North Tower of the World Trade Centre acts as a somber reminder of the tragedy of September 11, 2001 terrorist attack (aka
9/11). On a lighter note, in 1956 during a battle over control of the
Suez Canal, an Egyptian field kitchen was captured, much to the delight of the British soldiers who were able to use it to fry up potato crisps (a.k.a. french fries).
Located below what is now the Treasury building in Westminister, the
Churchill War Rooms is an underground complex that served as the secret command centre for the British government throughout WWII and allowed for centralized discussion and decision-making between the Chiefs of Staffs of the armed forces. Converting the basement of a public building, the War Rooms covered 3 acres and accommodated up to 528 Cabinet members and supporting staff. Following the war, a museum was added to this complex containing more artifacts from that time, plus the restoration of the suite of rooms used by Churchill, his wife and close associates. This complex was of particular interest to us after watching a re-creation of it in the movie “
The Darkest Hour”. We had also recently visited the
Diefenbunker in Ottawa, which was Canada’s version of an underground facility built during the Cold War of the late 1950s to early 1960s. Unlike the Churchill War Rooms, the Diefenbunker was never occupied during war time and Canadian Prime Minister John Diefenbaker never actually set foot in it. So it was even more fascinating for us to tour a complex that actually was used during a war.
One of the first sights that we encountered was an original
German 500-pound bomb like the ones that had been dropped on London during the Blitz. Since the War Rooms were situated in converted office space and not specially designed or built as a bunker, there was no real protection against such weapons. Finally in December 1940, several months into the Blitz, a protective layer of concrete 1-3 metres thick and reinforced by steel girders was inserted above the
War Cabinet Room to give it some protection. Part of this
concrete slab has been exposed for viewing. It was never certain that the slab would have held up under a direct hit from a bomb, but luckily, very few bombs were dropped in this area and the building never suffered a direct bomb strike. The War Cabinet Room is where Winston Churchill met with his Defence Committee, ministers, advisers, and military Chiefs of Staff. The room is laid out to show how it would have looked before the 5pm meeting of the War Cabinet that took place on October 15, 1940. Even the clock on the wall has been set to 5pm. To guard against surprise invasions from parachuting German soldiers, armed
Royal Marines were positioned inside and outside the War Room door and rifles were hung on the walls that could be easily accessed in case of an attack.
The
Chiefs of Staff had their own large conference room where they could strategize before meeting with the Prime Minister. The walls of the meeting room were covered with maps and on one of them, someone had drawn a caricature of Adolf Hitler. Much of the disseminated military information was gleaned through data coming from the
Map Room, where military personnel tracked military operations on all fronts. A team of officers would sift through military intelligence and arrange for it to be plotted on maps. One map tracked the devastating advance of German Forces into Russia in 1941-2 and their eventual retreat years later. Another map tracked the movement and daily positions of Allied convoys around the world. One officer recalled how heart-wrenching it was each time he had to remove the cardboard symbol of a ship that had been destroyed by the Germans. A daily intelligence bulletin would be prepared with the bare facts of the war situation to be shared each morning with the prime minister, chiefs of staff and the King.
While most of the personnel stayed in dormitories, we saw the
private bedrooms of some of Churchill’s military officers and senior ministers including his Aide de Camp, Military Advisor and even his personal Detectives. The modest rooms consisted of a military cot, dresser, mirror and wash basin, desk and chair with lamp and possibly a telephone, a side table and some guest chairs. Winston
Churchill’s own bedroom/office was obviously larger with the walls covered with maps and a real bed with box-spring, mattress, bedspread, and a chamber pot sitting at the foot of the bed. On his desk were multiple telephones and BBC broadcasting equipment so that he could make wartime broadcasts to the country. It was interesting to see the
bedroom for Churchill’s wife Clementine, which was a bit more feminine with the pink bedspread and rose-patterned armchair. The mere existence of this room was notable when compared to the Canadian Diefenbunker which did not accommodate the spouses or family members of any personnel, not even for the Prime Minister. Because of this, John Diefenbaker famously vowed that in case of war, he would not stay in the bunker but would remain above ground with his wife. As it turns out, The British Prime Minister and his wife actually spent very few nights in their Cabinet War Room bedrooms, preferring
to sleep at 10 Downing Street or in a suite of rooms directly above the Cabinet War
Rooms, known as No.10 Annexe.
Continuing on, we toured the Churchill's
dining room, kitchen, and some communications rooms. There was a secret transatlantic telephone room with a code-scrambling encrypted telephone that allowed Churchill to speak securely with American President Roosevelt in Washington. The former broom closet was disguised as Churchill’s private lavatory to discourage eavesdropping. We also saw rooms for the typing pool, switchboard operators and a BBC broadcasting equipment room. From the perspective of historical significance, it was quite incredible to be able to tour this secret underground compound "from whence Churchill led the war”.
A large
museum documents the history and career of Winston Churchill and the political climate during the war years, as well as displaying photos and artifacts from the Cabinet War Rooms. Black and white
archival photographs show personnel in action during the war, including the Royal Guards standing guard, the Prime minister’s chef preparing a meal and the operators manning their switchboards. Churchill hated
noise distractions so his secretaries used Remington “Noiseless” typewriters imported from the U.S. and a sign warned that “THERE IS TO BE NO WHISTLING OR UNNECESSARY NOISE IN THIS PASSAGE”.
Gas masks were on hand in the event of a gas attack and a warning system was in place where a rattle, whistle or siren would indicate an attack while a hand bell would sound the “all clear”. Being underground for so long, staff were given light treatments with portable sunlamps to prevent vitamin D deficiencies.
Staff passes (that resembled driver's licences) were required to access the War Rooms. Underground, there were only portable chemical toilets such as the one on display. Flush toilets were only available upstairs at ground level. There was an example of an
Enigma Encoding Machine used to crack German codes.
We got a glimpse into
Churchill’s childhood with a photo of Winston as a baby including a lock of his naturally curly brown hair, an oil painting of him at age 4, another photo of the precocious 7-year-old in a top hat and tails at boarding school where he proclaimed to be unhappy, lonely and quite the handful, and a photo at age 15 accompanied by his mother and his beloved younger brother Jack. There were images of Churchill during his
early army days in the British Army where he served in Cuba, India and Sudan and became a well-known war correspondent. During the beginning of the Boer War in 1899, Churchill traveled to South Africa as a journalist and was captured and taken as a prisoner of war. His daring escape from captivity made him a war hero. He wrote an article for the Morning Post documenting “The Story of My Escape” which included climbing a wall of the prison, walking to the train yards and hopping a train of out town, hiding under some coal sacks. After much more walking, hiding on various trains and rationing his food and water, Churchill finally made it to safety.
Pro-Churchill propaganda posters, cartoons and other artworks highlighted his toughness, bulldog tenacity and determination as well as his gift for the inspirational speeches and turns of phrases. Beverly Nichols of the Daily Telegraph aptly noted that “He mobilized the English language and sent it into battle”. Several posters reflected a few of his famous lines such as “Never was so much owed by so many to so few” and “Let us go forward together”. For Winston’s 80th birthday, a water-coloured cartoon was created by political caricaturist
David Low which depicted Churchill at various stages of his life, from infant to soldier to politician, all toasting his eventful life. Amusingly, even the images in the paintings on the wall are toasting Churchill.
Churchill had his share of
negative propaganda posters as well. These included ones created in earlier days by the same cartoonist David Low, who spent many decades creating scathing critiques of Churchill. A cartoon called “Winston’s Bag” from 1920 called out Churchill’s past mistakes as First Lord of the Admiralty including blunders in Russia, Gallipoli and Antwerp. Having spent an entire career mocking Churchill, when Low finally created the 80th birthday tribute piece, he signed it “From your old castigator”. Churchill was also attacked by German propaganda cartoons during the first World War which tried to depict him as weak, foolish and inept. The attacks against him by the Nazis and Japanese in the second World War were even more vicious as they accused him of starving, bombing and murdering civilians.
There was so much to see at the Churchill War Rooms and as with other attractions that we visited during this trip, we did not allow enough time to see it all. We had only allocated a few hours at the end of an already busy day so we were already tired before we even started. In retrospect, the War Rooms really require the larger part of a day to do it justice.

Located on the Victoria Embankment along the Thames River just North of the Churchill War Rooms, the Battle of Britain Monument is a magnificent bronze frieze by sculptor Paul Day, depicting scenes from WWII and particularly, the famous battle which saw the Allied air forces led by the British RAF Fighter Command successfully defend attacks from the German Luftwaffe between July to October 1940. Some say that this first major defeat of Germany in WWII marked a crucial turning point in the war. The monument consists of two long relief panels facing in opposite directions, with one side commemorating the achievement of the Air Force, while the other side depicts acts of self sacrifice and heroism from the British people as a whole. Bronzed plaques depicting the names and ranks of the airmen who participated in the battle are mounted on the sides of the monument. The Battle of Britain Monument was inaugurated in 2005. We were first made aware of it in 2006 when a few of the ceramic casts of some of the scenes were on display at the Gardiner Ceramics Museum in Toronto. Just from those few brief figures, we could tell that this would be something special and we made a note of adding a visit to this monument to the list of things we wanted to do whenever we returned to London. Our appetite was further whetted in 2013 when we stumbled upon a Paul Day exhibition in the ArtClub Gallery in Paris. From the Battle of Britain memorial, it was a short walk north to get to Soho.

Soho has been one of the main entertainment districts since the 19th Century, hosting a mix of shopping, dining, live theatre and nightlife. Once of the most famous landmarks is the Windmill Theatre, best known in the 1930s for its “tableau vivant” shows featuring nude performers posing perfectly still while representing static scenes. By remaining motionless like statues, the “Windmill Girls” were exempted from obscenity laws. The Windmill held the distinction of remaining open throughout World War II, surviving the German blitz while providing respite and entertainment for troops. That incarnation of the Windmill closed in 1964 and was repurposed as a cinema and then a Wild West revue, and now a table-dancing strip club called The Windmill International, in some respect, returning to its roots. As we wandered around Soho, we spotted the Art Nouveau features on the façade of the gallery Art of Diplomacy, and walked through a covered lane way, with interesting street art and ads on the walls, that led to the pedestrian street Walker’s Court.

But our main reason
for touring Soho was to visit a pair of chocolate shops including a branch of
the Italian chocolatier SAID which
originated in Rome and is known for its hot chocolate. Their rich, chocolatey regular hot chocolate
comes in dark, milk or gianduja
(hazelnut) flavours. Even more special
is the SAID Mocha, which consists of special blend coffee roasted in
Italy mixed with dark, milk and white chocolate and served in chocolate dipped
cups where the three shades of chocolate drip over the cup and onto the
saucer. We tried a gianduja hot
chocolate and a SAID mocha and both were so good that we decided to bring a hot
chocolate mix home with us. Our second
stop was to Paul A. Young Fine Chocolates where we bought a small box of
truffles that included flavours such as “Duck a l’orange caramel”, Pimm’s Cup,
Coffee and Walnut Cake, and Orange Crunch with rice crisps. We also bought a sea-salt and caramelized
chocolate brownies. On the way home, we
passed the restaurant “Duck & Waffle”
which delighted us since we were familiar with the concept of chicken and waffles but had
never heard of duck and waffles. In
addition to the signature dish with duck config leg, fried duck egg and mustard
maple syrup for the waffles, the menu had items like duck fat fries, duck
burger, fried duck tongue and duck salad.
Too bad we already had dinner plans and didn’t have an opportunity to
try this.


Always fascinating and informative, Annie. Restaurants noted for our future trips.
ReplyDeleteCheers,